The functionality of a vehicle’s door locks is a fundamental aspect of security and convenience, a fact underscored when this system fails. Owners of 2023, 2024, and 2025 Toyota Prius and Prius Prime models experiencing unresponsive remote locking or unlocking are likely encountering a damaged door lock actuator. This component, an electrically operated mechanism housed within the door, is critical for translating remote or manual lock commands into physical action. When it malfunctions, the entire locking system for that specific door is compromised. This article provides a detailed, step-by-step guide to diagnosing and replacing a faulty door lock actuator, ensuring owners can restore this essential functionality to their vehicles.
Understanding the Door Lock Actuator
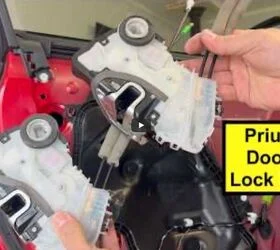
The door lock actuator is a small but vital electromechanical device responsible for physically moving the locking mechanism within a car door. It receives signals from the vehicle’s body control module (BCM) or directly from the remote key fob. Upon receiving a signal to lock or unlock, the actuator’s internal electric motor drives a series of gears or levers that engage or disengage the locking bolt. In modern vehicles like the Toyota Prius, these actuators are integrated into a complex system that also interacts with the door handle mechanisms, both internal and external.
When a door lock actuator fails, it typically does so due to wear and tear on its internal components, such as the electric motor, gears, or plastic linkages. Environmental factors, like moisture ingress or extreme temperatures, can also contribute to premature failure. In some instances, a sudden impact or a manufacturing defect could also be the cause. The symptom of a non-responsive remote lock is the most common indicator, though sometimes manual operation of the lock via the key cylinder or interior lock switch might also be affected, depending on the nature of the failure.
Diagnostic Process and Initial Steps
Before embarking on a replacement, it is prudent to confirm that the door lock actuator is indeed the culprit. While unresponsive remote locking is a strong indicator, other issues could manifest similarly. These might include a dead battery in the key fob, a fault within the BCM, or a problem with the wiring harness connecting the actuator to the vehicle’s electrical system.
A simple test involves trying the manual lock switch inside the vehicle. If this switch also fails to operate the lock, it further points towards a mechanical or electrical issue within the door itself, most likely the actuator. If the remote functions for other doors work correctly, it isolates the problem to the specific door in question.
Step-by-Step Replacement Guide
Replacing a door lock actuator on a 2023-2025 Toyota Prius or Prius Prime is a task that can be accomplished by a mechanically inclined individual with the right tools and patience. The process primarily involves removing the interior door panel to gain access to the actuator assembly.
1. Preparation and Tools
Gathering the necessary tools is the first crucial step. For this repair, you will typically need:
- Plastic Trim Removal Tools: Essential for safely prying off interior trim pieces without causing damage.
- Screwdriver Set: Including Phillips head and flathead screwdrivers.
- T30 Torx Bit Socket: Required for removing the actuator mounting bolts.
- 10mm Socket Wrench: For removing an internal brace.
- Ratchet Wrench: To utilize the sockets and Torx bit.
- Gloves: To protect your hands and maintain a clean working environment.
- Container for Screws and Parts: To keep track of removed hardware.
- New Door Lock Actuator: Ensure you have the correct part number for your specific vehicle model and year.
2. Removing the Interior Door Panel
The interior door panel is secured by a combination of screws and clips. The exact location of these fasteners can vary slightly between model years, but generally follows a pattern:
- Armrest Pocket: Locate and remove any screws hidden within the armrest pocket, often behind a sliding cover.
- Interior Door Handle: A small plastic cover, usually near the interior door handle, conceals another screw. This cover can be gently pried off with a trim tool.
- Window Switch Assembly: The entire window switch assembly often pops out, revealing a screw underneath. Disconnect the electrical connectors to the switches before proceeding.
- Bottom Edge and Sides: Once the visible screws are removed, the panel is held in place by plastic clips around its perimeter. Starting from a lower corner, typically near the speaker grille, use a plastic trim tool to gently pry the panel away from the door frame. Work your way around the panel, releasing the clips. It is crucial to support the panel as it becomes loose to prevent it from falling and potentially damaging wiring or the panel itself.
Once the panel is detached, carefully disconnect the cables for the interior door handle and the door lock mechanism from their attachment points on the panel. This will allow you to set the door panel aside, providing full access to the internal components of the door.
3. Accessing and Removing the Door Lock Actuator
With the door panel removed, you will see a metal inner door shell, often covered by a plastic or foam weather shield. Carefully peel back or remove this shield to expose the door’s internal mechanisms.
- Vertical Brace: Identify and remove the two bolts securing an internal vertical brace using the 10mm socket. This brace often obstructs direct access to the actuator.
- Actuator Mounting Bolts: Locate the door lock actuator, typically a black plastic housing with linkages attached. It is secured by several T30 Torx bolts. Loosen and remove these bolts.
- Linkage and Wiring Disconnection: The actuator is connected to the exterior door lock cylinder and the interior door handle mechanism via metal rods or cables. These linkages need to be carefully detached. There may also be a wiring harness connector attached to the actuator or a cover nearby that needs to be unclipped. Pay close attention to how these linkages are attached; taking a photo can be helpful for reassembly.
- Cover Removal: A black plastic cover, often with wiring attached, may need to be loosened or removed to facilitate actuator removal. This cover is usually secured by plastic clips and quarter-turn fasteners.
Once all fasteners, linkages, and electrical connections are detached, the faulty actuator can be carefully maneuvered out of the door cavity. It is essential to exercise caution during this step, as the linkages are delicate and can be bent or damaged if not handled properly.
4. Installing the New Actuator
Before installing the new actuator, compare it side-by-side with the old one. Verify that the part numbers match and that the dimensions and linkage points are identical. This ensures compatibility and correct functionality.
- Linkage Alignment: The most critical part of installation is correctly aligning the new actuator with the metal linkages for the exterior door lock cylinder and the interior door handle. It is often recommended to first connect the linkage for the exterior lock, as it can be more challenging to access. Then, connect the linkage for the interior door handle. Ensure these are securely clipped or attached.
- Securing the Actuator: Position the new actuator into its mounting location and reinstall the T30 Torx bolts, tightening them securely.
- Reconnecting Wiring: Attach the electrical connector to the new actuator.
- Reinstalling Covers and Brace: Reattach any covers, ensuring all clips and fasteners are engaged. Reinstall the internal vertical brace with its two 10mm bolts.
5. Crucial Testing Before Reassembly
This step cannot be overemphasized and is highlighted by the repair guide’s author, Bozidar Tatarevic. Before you reattach the interior door panel, it is imperative to test the functionality of the newly installed actuator.
- Electrical Connection: Temporarily reconnect the electrical connector to the actuator.
- Remote Lock Test: Use the vehicle’s remote key fob to attempt to lock and unlock the door. Verify that the actuator engages and disengages smoothly and audibly.
- Manual Lock Test: Test the interior lock switch and, if accessible, the exterior key cylinder to ensure manual operation is also functioning correctly.
- Linkage Check: Manually manipulate the door handle and exterior lock cylinder (if applicable) to feel for proper resistance and movement, confirming the linkages are correctly connected and operating the actuator.
This pre-reassembly testing is a critical failsafe. If the actuator is not functioning correctly at this stage, it is far easier to make adjustments or troubleshoot issues with the door panel off. Discovering a problem after the panel is reinstalled would necessitate repeating the entire removal process.
6. Reassembly of the Door Panel
With the door lock actuator confirmed to be working perfectly, proceed with reassembling the door panel. This process is essentially the reverse of the removal steps.
- Cable Connections: Reconnect the interior door handle cable and the door lock mechanism cable to their respective points on the door panel.
- Window Switch Wiring: Reconnect the electrical connectors to the window switch assembly.
- Panel Clipping: Carefully align the door panel with the door frame and press firmly around the edges to engage the plastic clips.
- Reinstalling Screws: Reinstall all previously removed screws in their correct locations.
- Trim Piece Reinstallation: Replace any plastic trim pieces that were removed.
7. Final Verification
Before closing the door completely, perform one final, critical test.
- Remote Lock Test with Door Ajar: With the door still slightly open, use the remote key fob to lock and unlock the vehicle. This ensures that the lock is functioning and that the door can still be opened from the outside. This is a vital safety measure to prevent being locked out of your own vehicle if an installation error occurred.
- Full Door Closure: Once satisfied that everything is working correctly, close the door fully and perform another remote lock and unlock cycle.
Broader Context and Implications
The detailed guidance provided by Bozidar Tatarevic, a seasoned racing mechanic and technical consultant with extensive experience across various automotive disciplines, lends significant credibility to this DIY repair guide. Tatarevic’s background, including his work with Vasser Sullivan Racing in IMSA and his consulting agency Podium Prime, underscores his deep understanding of automotive mechanics and systems. His approach, emphasizing meticulousness and thorough testing, reflects professional standards applied to everyday vehicle maintenance.
The TTAC Creators Series, of which this guide is a part, aims to share valuable knowledge from automotive enthusiasts and professionals. By translating complex repairs into accessible, step-by-step instructions, such initiatives empower vehicle owners to tackle common issues, potentially saving them time and money on dealership repairs. The emphasis on testing before full reassembly is a testament to the practical, real-world experience of the guide’s author, preventing common pitfalls that could lead to further complications.
The implications of a functioning door lock system extend beyond mere convenience. It is a core component of a vehicle’s security system, deterring theft and unauthorized access. For hybrid and electric vehicles like the Toyota Prius, which often incorporate advanced electronic systems, understanding the mechanical and electrical interplay within components like the door lock actuator is increasingly important for owners.
This repair, while seemingly straightforward, requires a degree of mechanical aptitude and attention to detail. The careful handling of trim pieces, delicate linkages, and electrical connectors is paramount to a successful repair. The core takeaway from this guide is the importance of methodical work and rigorous testing at key stages, ensuring that the vehicle’s functionality is restored without introducing new problems. For owners comfortable with basic automotive repairs, replacing a faulty door lock actuator on their 2023-2025 Toyota Prius or Prius Prime is an achievable task that can restore peace of mind and full operational capacity to their vehicle.